June 20, 2025
.jpg)
In the modern enterprise, cellular connectivity is no longer a luxury—it is a utility as vital as electricity. Yet, modern building materials like LEED-certified Low-E glass, high-density concrete, and steel superstructures act as Faraday cages, efficiently blocking the LTE and 5G signals your business relies on.
For warehouse managers using cellular-connected IoT scanners, or hospital administrators relying on mobile telemetry, a "one-bar" signal is a liability that translates directly into lost revenue and operational risk. The solution is not a consumer-grade booster found on Amazon; it is a professionally engineered Distributed Antenna System (DAS).
This comprehensive guide dissects the technical architecture of DAS, the critical regulatory landscape of NFPA fire codes, and how Metro Wireless delivers turn-key in-building coverage that integrates seamlessly with your SD-WAN and failover strategies.
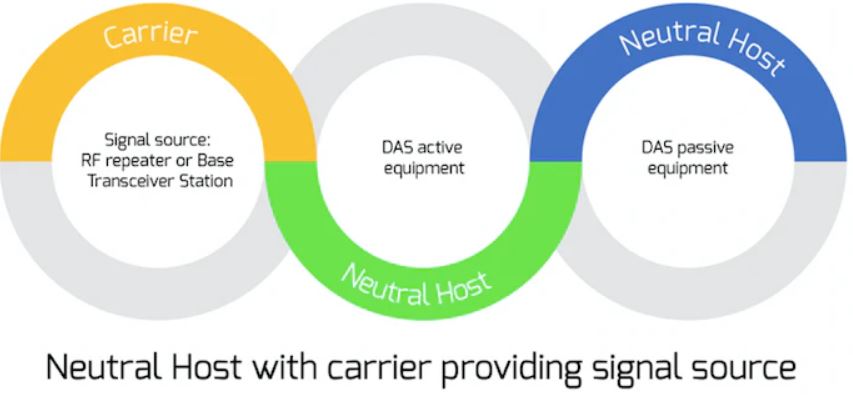
A Distributed Antenna System (DAS) is a network of spatially separated antenna nodes connected to a common source that provides wireless service within a geographic area or structure.
Unlike a standard Wi-Fi router that broadcasts from a single point, a DAS distributes the signal source (from carriers like Verizon, AT&T, and T-Mobile) throughout a facility using a backbone of fiber optics or coaxial cabling. This ensures uniform signal strength in every corner of a 500,000-square-foot warehouse or a 50-story office tower, much like the robust coverage seen in private LTE networks for industrial IoT.
.png)
It is critical to distinguish between enterprise-grade DAS and residential "boosters." The difference lies in the Link Budget— the accounting of power gains and losses in the system, especially when considering the business case for switching to private wireless.
Selecting the right DAS architecture depends on your building's size, user density, and budget. Understanding the physics of attenuation (signal loss) is key to making the right choice, especially when comparing alternatives like private cellular networks versus Wi-Fi.
Passive systems capture a signal from a donor antenna on the roof, amplify it via a Bi-Directional Amplifier (BDA), and distribute it over coaxial cable.

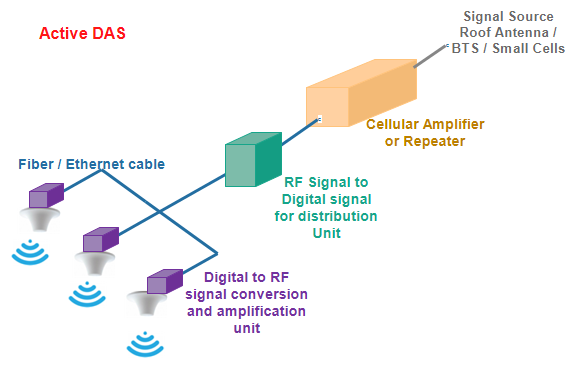
Active systems convert the radio frequency (RF) into light/digital signals at the "Headend." This signal travels over fiber optic cables to Remote Radio Units (RRUs) deep inside the building, where it is converted back to RF.
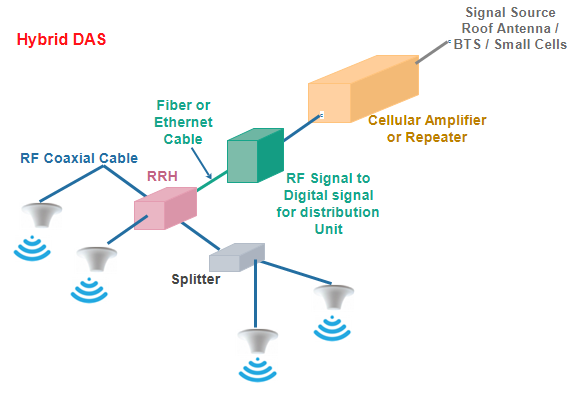
Modern solutions, such as the Nextivity Cel-Fi QUATRA 4000, combine the best of both worlds. They utilize "Off-Air" donor signals but distribute them internally using digital Ethernet cabling.
For commercial and public buildings, installing a DAS is not just about Netflix streaming speeds; it is a matter of life safety and legal compliance.
Emergency Responder Communication Enhancement Systems (ERCES) are mandated by the International Fire Code (IFC 510) and NFPA 1221 to ensure firefighters and EMTs can communicate inside your building. Metro Wireless designs systems that strictly adhere to these codes, aligning with broader trends in private 5G and LTE networks:
The riser cables connecting your system must survive a fire for at least 2 hours. We utilize 2-Hour Fire-Rated cabling (such as DragonSkin) or route standard Plenum cables through protected concrete shafts or fire-rated soffits to meet code.
When the power goes out, your emergency comms cannot. Our systems integrate UL-2524 listed battery backup units capable of running the DAS for 24 hours during a grid failure.
Equipment in harsh environments (like pump rooms) is housed in NEMA-4 (water/dust tight) enclosures, often painted red as required by local fire marshals to signify life-safety equipment.

Gone are the days of "install and forget." Metro Wireless leverages the Cel-Fi WAVE Portal to provide intelligent, cloud-based management of your wireless infrastructure.
Installing a DAS isn’t as simple as plugging in a router. It is a multi-step construction process that requires navigating RF physics, fire codes, and complex cabling.
This installation process relies heavily on the propagation modeling and engineering work completed beforehand. Here is how our field teams execute a deployment, broken down into three key phases.
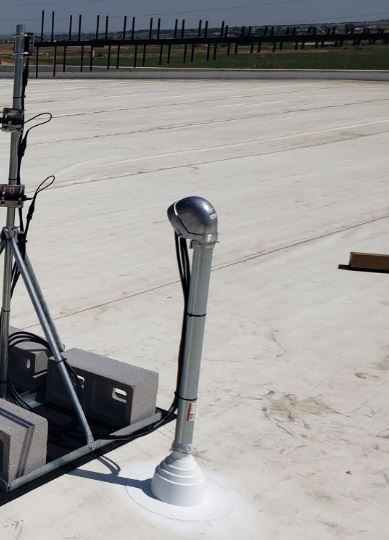
Donor antennas are the gateway to the outside world. They pick up the outdoor 5G Signal from the macro network (Verizon, T-Mobile, AT&T) and bring it inside the building to be redistributed.
From our initial site survey, we know exactly where to mount the antennas for the strongest signal. We typically use non-penetrating ballast mounts to avoid drilling holes in your roof membrane. Crucially, where cables enter the building, we install a Weatherhead. This ensures that while the signal gets in, rain, snow, and wind stay out.
We don't use generic antennas. Depending on the site environment, we deploy:

This is the "art" of the install. Using professional RF cellular signal meters (like the COMPASS XR), our technicians fine-tune the position of the antenna. We treat this like tuning an old-school radio—adjusting by millimeters until we achieve the highest Signal-to-Noise Ratio (SINR).
Once the signal is inside via the riser cables, it needs to be processed and distributed. This happens in the MDF (Main Distribution Frame) or Telco Closet.
We typically install Nextivity Cel-Fi QUATRA systems. The Network Unit (NU) is the traffic director. It digitizes the RF signal to prevent degradation.

Coverage Units (CUs) are distributed throughout the facility. They take the digital signal from the NU and broadcast it to your users.

Depending on your facility type, we mount internal server antennas to maximize propagation:

Using the appropriate attachment/securement method, such as D-rings on warehouse I-beams or custom mounts, our field installation team mounts all the server antennas.
Coax cables are then carefully routed to each antenna, with a little extra slack just in case. Once they’re in place, we connect the antennas, using splitters or couplers as needed to balance the signal levels being broadcast (e.g., 10 dB, 6 dB, 2 dB DAS couplers).
After this phase, the hard work is mostly over!
No DAS installation is complete without rigorous validation. Simply "turning it on" is not enough; we have to prove it works. Cloud-based commissioning is key; explore it further in configuring and monitoring DAS.
Upon completing the physical installation, we register and provision the network unit via the cloud portal. Our team checks the vitals:

This is the final exam. Our technicians walk the entire facility, room by room, performing a Grid Test. We measure the new signal against the baseline data from our pre-install survey.

To see how these deployment steps come together in practice—from initial site surveys to final grid testing—explore real-world examples in our DAS case studies.
Every DAS install involves a carefully chosen set of tools and components. Beyond the standard cabling gear, our teams deploy:

What separates a functioning system from a high-performance network? It is all in the details.
The setting of your DAS installation changes everything. With their towering shelves and massive metal machinery, warehouses eat signals for breakfast. Offices, on the other hand, often allow signals to glide through drywall—until someone adds a new glass conference room, and your plan goes out the window.
Here is how we adapt to each space:

Each building is a character in its own story. Beyond the basic layout, here are real-world environmental quirks we encounter while installing DAS solutions:

Installing a Distributed Antenna System is not a DIY project; it is a complex integration of RF physics, construction engineering, and federal regulatory compliance. Whether you are retrofitting a historic warehouse or commissioning a LEED-certified office tower, the reality is the same: modern building materials are the enemy of cellular signals.
You cannot rely on hope or a consumer-grade gadget to keep your business connected. You need a calculated, engineered solution that guarantees coverage for your IoT devices, your staff, and your first responders. Metro Wireless removes the complexity of carrier negotiations and fire codes, delivering a turn-key, future-proof 5G infrastructure that simply works. Don't let a dead zone be the reason you lose a client or compromise safety.
Do I really need to register my system with the carriers?
Yes. Under FCC Part 90 regulations, operating a commercial signal booster or DAS without the express consent of the spectrum licensee (Verizon, AT&T, T-Mobile) is illegal. Unregistered systems can cause interference with the macro network, leading to potential fines exceeding $100,000 and equipment confiscation. Metro Wireless handles this entire "Carrier Coordination" process for you, securing the necessary Retransmission Agreements before the system goes live.
What is the difference between a cheap Amazon booster and a DAS?
It comes down to physics and legality. Consumer "plug-and-play" boosters (FCC Part 20) are capped at roughly 70dB of gain and use analog repeating that often creates "noise" rather than a clear signal. They typically fail in buildings larger than 5,000 square feet due to coaxial cable signal loss. An enterprise DAS (Hybrid or Active) provides up to 100dB of gain, uses lossless digital cabling (fiber/Ethernet), and is engineered to support thousands of simultaneous users without crashing, unlike the distinctions highlighted in how SD-WAN differs from firewalls.
How long does a DAS installation take?
The physical installation—running cable and mounting antennas—can often be completed in a few weeks depending on the building size. However, the administrative timeline is longer. Carrier approvals typically take 30 to 90 days depending on the responsiveness of the mobile network operators. We recommend starting the design phase early (even during pre-construction) to account for this regulatory lead time.
Will a DAS interfere with my existing Wi-Fi network?
No. Cellular signals (LTE/5G) and Wi-Fi operate on completely different radio frequencies. In fact, a DAS complements your Wi-Fi. By offloading voice calls and mobile data to the cellular network, you free up bandwidth on your local Wi-Fi network for internal business applications, actually improving overall network performance.
Is ongoing maintenance required? Yes, specifically for code compliance. If your system is installed to meet NFPA 1221/IFC 510 public safety standards, an annual inspection is typically required by the local fire marshal to ensure battery backups and alarms are functional. For cellular performance, Metro Wireless offers 24/7 cloud monitoring to remotely adjust signal gain and troubleshoot issues before they affect your users.
A Distributed Antenna System is just one piece of the puzzle. To truly future-proof your operations, you need a network partner that delivers the entire connectivity stack—from the rooftop to the server room, including options like private LTE and 5G cellular networks.
At Metro Wireless, we don't just boost signals; we engineer resilience. Whether you need blazing-fast Fixed Wireless Access, Dedicated Internet, or SD-WAN with unbreakable LTE/5G Failover, we have the hardware and the expertise to keep your business online, 24/7/365.
Ready to upgrade your infrastructure? Explore our Fixed Wireless Internet solutions for high-speed connectivity or how our Managed SD-WAN services can enhance your failover strategies.
Contact Metro Wireless today to schedule your custom consultation and experience our carrier-agnostic approach firsthand. Let’s get to work.

Tyler Hoffman
CEO
